

Tower of chocolate coffee cake.
Ingredients:
For cake:
2 ounces bittersweet or semisweet chocolate chopped
2 ounces unsweetened chocolate, chopped
6 tablespoons hot coffee
1 cup unsalted butter, at room temperature
1 1/2 cup sugar, divided
4 large egg yolks
2 cups flour
1 teaspoon baking powder
1 teaspoon baking soda
1 1/2 teaspoon salt
1 cup buttermilk, at room temperature
1 teaspoon vanilla extract
4 large egg whites
For decorating:
4 cups of whipped cream
1 carton fresh strawberries, cleaned, cored, and sliced in half
1 handful each of fresh blueberries
1 handful each of fresh raspberries
1/2 cup chocolate ganache, warmed and ready to pour
Instructions
To bake the cake:
1. Butter single 3-inch deep, 9-inch cake pan, lining the bottom with a round of parchment or wax paper (trust me, this will make your life much easier). Preheat the oven to 350 degrees.
2. Over a double boiler, melt both kinds of chocolates together with the 6 tablespoons of coffee. Stir until smooth, then set aside until the chocolate reaches room temperature.
3. With an electric mixer, beat the butter and 1 1/4 cup of the sugar until light and fluffy, about 5 minutes. While beating, slowly drizzle in the melted chocolate, following with the egg yolks one at a time.
4. In a separate bowl, sift together the flour, baking powder, baking soda and salt.
5. Mix half of the sifted dry ingredients into the creamed butter, then add the buttermilk and vanilla. Follow with the rest of the dry ingredients.
6. In a separate bowl, beat the egg whites until they hold soft peaks. Add the remaining 1/4 cup of sugar and continue beating until stiff peaks form.
7. Fold half of the egg whites into the cake batter to lighten it up a bit, then fold in the rest, stopping just when there’s no trace of egg white visible. Do not overbeat or you will flatten the batter.
8. Pour the batter into the prepared cake pan with a parchment round in the bottom. Smooth the top of the batter with your finger and bake for about 50 minutes, until a toothpick inserted into the center comes out clean.
9. Cool cake completely before decorating.
To decorate the cake
Note: If you’re going to slice your cake horizontally, I’d recommend putting it in the refrigerator overnight (or at least a few hours) to firm up before slicing. The firmness of the cake will allow for more effective slicing. I highly recommend the use of a cake leveler, though a serrated knife will work in a pinch.
Level your cake by removing the rounded top where it rose in the oven. You can either use a long serrated knife or a cake leveler. I use the leveler, because it’s a cheap tool that does the job very well, and it’s a lot easier to make straight layers by walking the leveler in a sawing motion, instead of making crooked layers with a serrated knife.
If you poured all of your batter into a single 9″ pan, cut it into three layers of equal thickness.
Place your base layer of cake onto a lazy Susan or other turnable decorating surface. Trust me, this will make your life easier.
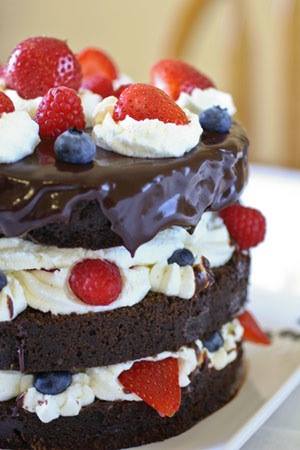
Scoop whipped cream into a pastry bag, and using a large star tip of your choice, pipe a series of swirls around the edge of the cake, with a large swirl in the middle. Decorate each dab of whipped cream by adding a piece of fruit into the middle. Do not add any fruit to the large swirl of whipped cream in the middle.
Using the pastry bag, add a small dab of whipped cream between each larger swirl. Top each dab with a blueberry. If you have three layers, gently place the middle layer of cake on top of the decorated layer, making sure it’s straight. Decorate with whipped cream as you did the first layer, so that they look the same.
Place final layer of cake on top of decorated layer. Pour 1/2 cup ganache into the center of the cake, and using an icing spatula gently push the ganache to the edges, allowing it to artfully dribble over the sides. NOTE: You don’t want a lot of ganache flowing all over the place. You just want a few drips down the side as an accent.
Set the cake in the refrigerator for 20 minutes to solidify the ganache.
Decorate the top of the cake with more whipped cream and fruit, like you did the other layers. You can be as creative as you want here, so go all out! When you’re done, push more fruit into the visible whipped cream between the layers where it needs a little color. You should have something similar to the photo below.
This cake should be put in the fridge overnight to tighten up the whipped cream, which may droop and run in hot weather. Refrigerator until about an hour before serving. If it’s especially hot that day, leave it in the fridge until just before you cut it.
Enjoy!


 Facebook
 Twitter Joel
 Pinterest
 Youtube